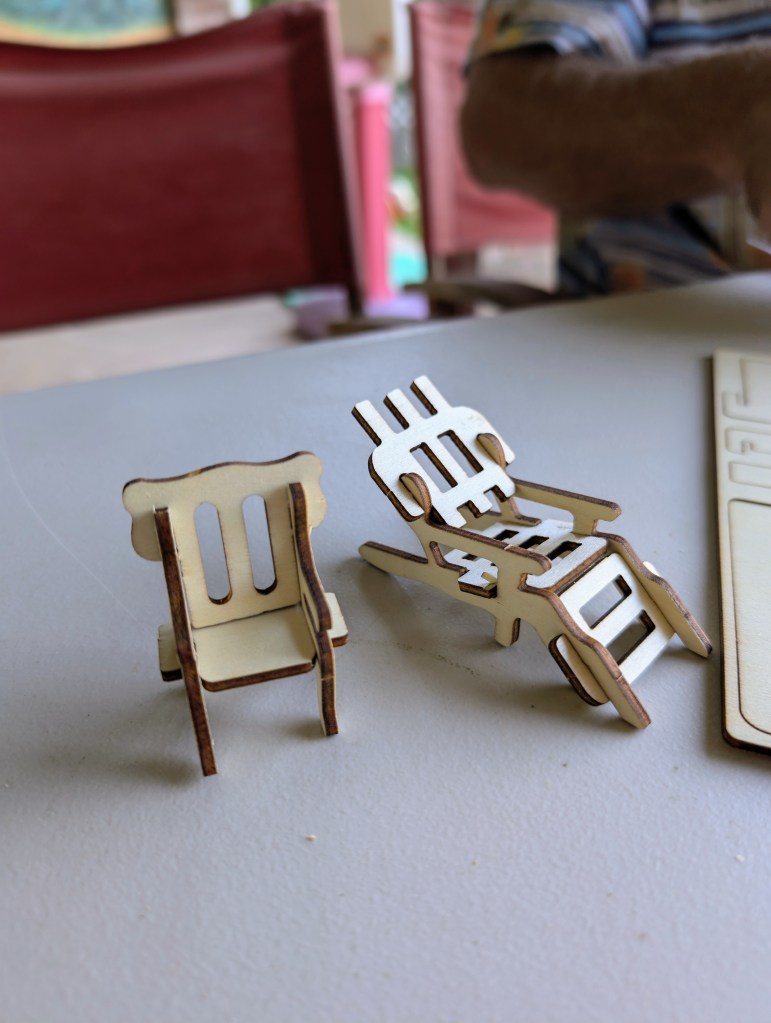
(Furniture is 1:24 Scale for a Dollhouse)
There’s a certain kind of magic that happens when children, imagination, and a bit of wood glue come together. For us, it began in the backyard when Neil and Leon joined their Grandpa at the picnic table, surrounded by tiny wooden cutouts, a cordless drill, and the promise of something whimsical. Their cousins, Stella and Celeste, had already built a “Fairie Village” out of flower pots, old lanterns, and mismatched garden toys tucked into the grass. It needed one final touch: furniture. What good is a fairy inn without a chair to rest upon or a table to sip from? That’s when Grandpa and the boys got to work.
The boys’ enthusiasm was contagious. Neil’s eyes widened when he got to hold the drill (with Grandpa’s guiding hands, of course), while Leon, munching a cracker, supervised like a tiny foreman. Piece by piece, they punched out the wooden parts from the sheets, fitting chairs and tables together with all the seriousness of real carpenters. By the time they finished, a dainty parlor set was ready, and Tinkerbell herself looked right at home perched upon a chair. The Fairie Village now had a gathering place, and the kids had created more than furniture—they had built memories.
This experience sparked a question many parents ask: how do you actually make tiny wooden furniture for dollhouses, and how can you turn it into a fun project with kids? Let’s break it down.
Why 1:24 Scale Wooden Furniture?
Miniature furniture at 1:24 scale (half-inch scale) is the perfect size for fairy gardens, dollhouses, or imaginative backyard “villages.” Unlike plastic alternatives, wooden pieces are sturdy, natural, and can be decorated in endless ways. Building them also becomes an activity that teaches fine motor skills, patience, and creativity. Best of all, it’s a collaborative project—adults can help with tricky cuts and tools, while children can handle assembly, sanding, and painting.
Materials You’ll Need
Creating tiny wooden furniture doesn’t require a fully stocked woodworking shop. Many kits are available online or at craft stores, but you can also design your own from thin wood sheets. Here’s a starter list:Wood sheets: 1/16″ to 1/8″ plywood or balsa wood works best.Cutting tools:
A craft knife or scroll saw (for adults).
Glue: Wood glue or tacky craft glue.
Sandpaper: Fine grit for smoothing edges.
Paints and brushes: Acrylic paints are easy for kids.
Optional embellishments: Fabric scraps, beads, or moss for cushions and décor.
Protective gear: Safety glasses and supervision for little ones.
Step-by-Step: Building Tiny Wooden Furniture
1. Choose Your Design
Start simple. Chairs, benches, or a small table are manageable first projects. Kits with pre-cut pieces can speed things up, but free printable patterns are also widely available. Check out Print Mini for some stencils in 1:24 scale. Trace the shapes onto your wood sheets if cutting by hand.
2. Cut and Prepare
Adults should handle the cutting. Once the pieces are ready, invite the kids to sand the edges smooth. This step makes the furniture safer to handle and gives little ones a chance to help early on.
3. Assembly
Use wood glue sparingly to connect pieces. Grandpa’s steady hands paired with Neil’s excitement made this part extra fun—they matched notches, held parts together until the glue set, and celebrated each successful fit. Kids can be in charge of holding the pieces, counting how long to wait, or wiping away extra glue.
4. Painting and Decorating
This is where the project becomes truly magical. Use acrylic paints to create bright colors or natural wood stains for a rustic look. The cousins in our story loved adding touches of glitter to the fairy chairs and painting tiny flowers onto the tabletop. Fabric scraps can be glued on for cushions, beads for knobs, and dried moss for that woodland look.
5. Place in the Fairie Village
Once the pieces are dry, let the children set them into their outdoor fairy world. Suddenly, the lanterns became fairy homes, the flower pots turned into towers, and the tiny chairs found their place under a mushroom canopy.
How to Make a Fairie Village with Kids
Furniture is only part of the enchantment. To create a complete Fairie Village, gather items you already have:
Old lanterns: They make perfect fairy houses once placed on the grass or filled with tiny lights.
Flower pots: Flip them upside down and paint doors and windows for whimsical cottages.
Stones and shells: Create fairy pathways or garden borders.
Twigs and leaves: Mini fences, ladders, or fairy bridges.
Mini lights or candles (battery powered): Add glow for nighttime magic.
Figures: Small fairies, animals, or even Lego people can join the scene.
Invite the kids to take charge. Stella and Celeste used their imagination to set up homes, yards, and even a “fairy playground” in the backyard. When Neil and Leon added their wooden chairs and tables, the village suddenly felt alive. The fairies had a community space, and the children had a story world to keep building upon.
The Benefits of Building Together
At its heart, this project is more than a craft—it’s a bonding experience. Watching Grandpa teach his grandsons how to line up pieces or seeing cousins collaborate on where the fairy furniture should go creates a sense of teamwork. The kids learn patience, problem-solving, and creativity, but they also feel pride in contributing to a world that didn’t exist before their hands touched it.
Parents often wonder how to nurture imagination in an age of screens. The answer can be surprisingly simple: give children raw materials, a bit of guidance, and the freedom to create. Whether the result is a slightly lopsided chair or a perfectly crafted table, the real treasure is in the making.
